 Roni Essex
Freediver, Spearo, Creator
Roni Essex
Freediver, Spearo, Creator
Share this on
Roni Essex
Freediver, Spearo, Creator


Spearfishing is all about location. Even the most skilled diver with the best gear is at the mercy of the environment they choose. While experience, local knowledge, and research are crucial, there’s an underrated tool that can give you a major edge before you even get in the water—Google Maps. This free, accessible technology allows spearos to scout new locations, identify promising structures, and even analyze seasonal changes in the underwater terrain.
In this guide, we’ll break down exactly how to use Google Maps to find new and worthy spearfishing spots, no matter where you are in the world.
Traditionally, spearfishers rely on local divers, nautical charts, word-of-mouth, and direct scouting to find good locations. While these are still invaluable, Google Maps allows you to scout locations remotely, analyze water conditions, and narrow down your targets before you even leave your home. You can identify underwater structures such as reefs, drop-offs, kelp beds, and sandbars. It also helps in checking accessibility, avoiding long and exhausting hikes or dangerous cliff entries. You can find isolated locations away from overfished or overcrowded spots and analyze seasonal changes to see how different times of the year affect the area. Additionally, it enables you to plan alternative entry and exit points, ensuring you always have a backup plan.

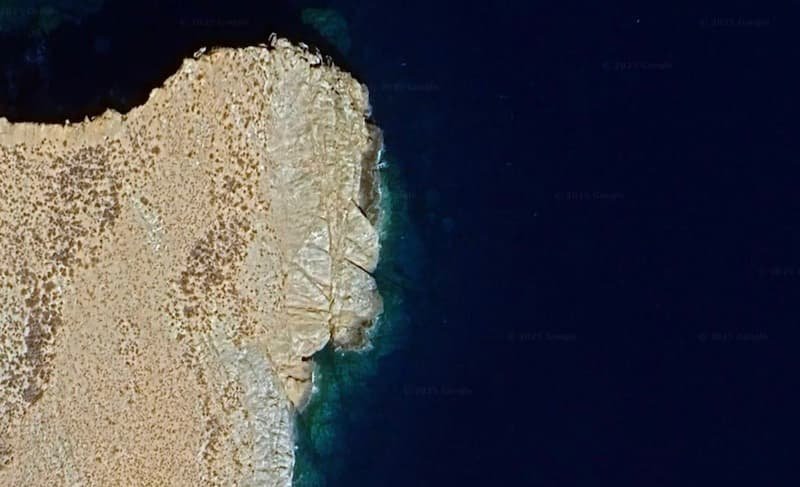
Before you start scanning Google Maps, you need to define your search criteria. Consider whether you are looking for reef fish, pelagics, or bottom-dwelling species. Determine if you are diving from shore or a boat and whether you prefer deep drop-offs or shallow reefs. It is also essential to know if you need protection from strong currents. Open Google Maps and switch to Satellite mode, zooming in on coastal areas to get a bird’s-eye view of the ocean floor and structures. Look for contrasting colors, as dark patches often indicate reefs, rocky formations, or kelp beds, while lighter areas suggest sandy bottoms. Check for depth changes as steep drop-offs are great for attracting larger pelagics. Isolated structures that are unmapped reefs or rocky points often hold fish because they see less pressure. Examine inlets, headlands, and points, as these areas experience strong currents that bring baitfish and larger predators.
Once you’ve identified some promising areas, you need to break down their structure to determine if they’re actually worth visiting. Dark patches with irregular shapes often indicate rocky reef structures, which attract groupers, snappers, and lobsters. If the reef is offshore or near a headland, it may hold pelagics like kingfish, wahoo, or tuna. Steep depth changes are hotspots for fish that hunt along vertical structures. Look for areas where shallow reefs suddenly drop into deeper water, as these locations are ideal for species like amberjack, dogtooth tuna, and big groupers. Kelp beds are prime hunting grounds for calico bass, sheepshead, and white seabass, while grass flats hold smaller reef fish but can also attract rays and larger predators. Sandy bottom areas with depressions are ideal for targeting flounder, halibut, or stingrays, and larger predators often cruise the edges of sandy patches looking for food.

After identifying potential spots, the next step is to determine how accessible and safe they are. For shore diving, check if there’s an easy entry and exit while avoiding areas with heavy surf or strong shore breaks. Look for natural barriers like cliffs that might make exits difficult. For boat diving, ensure there’s enough depth to safely anchor nearby. Look for protected areas in case of sudden wind or swell changes, and check how far offshore the spot is to determine if it’s reachable with your boat size. Be mindful of hazards such as shark activity, strong currents, and marine protected areas where spearfishing may be prohibited.
Google Maps is powerful, but pairing it with other resources can give you a more complete picture. Google Earth Pro offers a 3D seabed feature that helps visualize underwater drop-offs more accurately, making it useful for deep-sea spearfishing locations. Nautical charts such as Navionics, Garmin, or NOAA provide depth, currents, and underwater hazards, and some apps allow you to overlay Google Maps with detailed depth contours. Wind and swell forecasting tools like Windy, or Surfline help in checking conditions before planning a dive. Understanding ocean conditions helps you pick the best day to explore a new spot. Additionally, leveraging local knowledge through spearfishing forums, social media, or fishing reports allows you to cross-check findings with real-world insights.
Once you’ve done your research, it’s time to put it into practice. If possible, snorkel the spot first before bringing your speargun. This helps you assess fish activity, structure, and any unexpected hazards. Water clarity and fish activity can change daily, so have a few backup locations in case conditions are poor. Keep track of successful dives and conditions for future reference, building a personalized spearfishing map over time.
Google Maps isn’t just for finding roads—it’s a powerful tool for spearfishers looking to discover new, untouched hunting grounds. With the ability to analyze underwater features, check access points, and cross-reference conditions, you can save time, effort, and money while maximizing your chances of a successful dive. So next time you’re planning a spearfishing trip, don’t just rely on word-of-mouth. Open up Google Maps, start exploring, and find that perfect spot before anyone else does.